
Outdoor Lighting Keeps Failing? Find the Real Cause
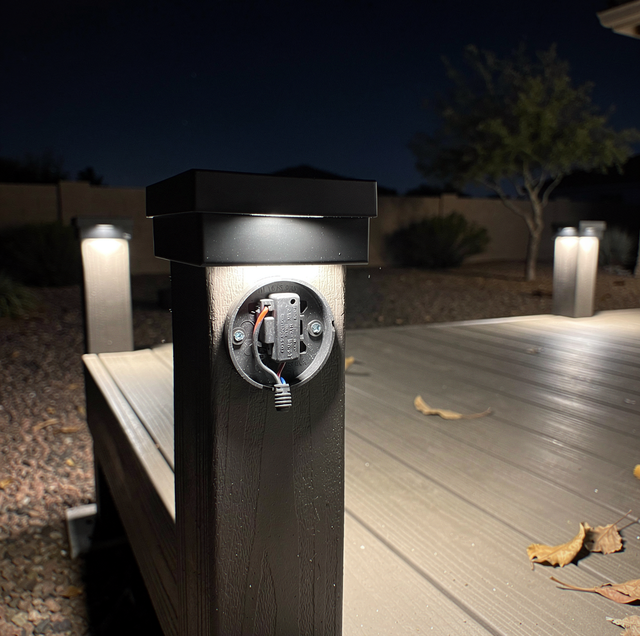
Outdoor lighting rarely fails all at once — it erodes. A dimming fixture in spring is a dead one by summer, and by the time a whole section of the yard sits unlit after the first heavy monsoon storm, most homeowners have already swapped bulbs that were never actually the problem. Chasing each dead fixture individually rarely solves anything, because the actual cause usually sits upstream of the fixture itself, at the transformer, at a connection somewhere along the run, or in how the system was wired in the first place. Working through it in order gets to that cause faster than guessing, and it usually means fewer fixtures end up replaced than the initial symptom would suggest.
Step 1: Check the Transformer First
Most low-voltage outdoor lighting runs through a transformer that steps household 120-volt power down to 12 volts for the fixtures. That transformer typically includes a photocell or timer to control on/off cycles and often an internal reset breaker, separate from the breaker in your main panel. If the transformer's internal breaker has tripped, or its timer settings have drifted or reset (common after a brief power blip), an entire zone of fixtures can go dark at once with nothing wrong at any individual light. This is worth checking before touching a single fixture, since it's the single point every downstream light depends on. A quick reset of the internal breaker, or confirming the timer's clock and on/off schedule still match what was originally programmed, takes a few minutes and rules out the most common cause before any tool comes out.
Step 2: Inspect the Wire Connections at Each Fixture
Direct-bury low-voltage cable connects to each fixture via a splice, and moisture intrusion at that splice is the most common single cause of recurring outdoor lighting failures. A connection that isn't sealed in a gel-filled or waterproof connector lets ground moisture work into the copper over time, corroding the connection and increasing its resistance. Unlike a sudden failure, this kind of corrosion builds gradually, which is why lights along a run tend to dim before they go fully dark rather than cutting off all at once.
Step 3: Understand Voltage Drop Along the Run
Low-voltage systems lose more voltage per foot of cable than standard 120-volt household wiring does, simply because there's less voltage to begin with. Over a long run, that drop accumulates: the first fixture near the transformer approaches full voltage, while a fixture 100 feet or more down the same run can receive several volts less by the time the power reaches it. That's why the fixture farthest from the transformer is so often the first one to dim noticeably or fail outright, even when nothing is actually broken at that fixture. Adding a single corroded connection partway down the same run compounds the effect, since resistance from a bad splice and ordinary voltage drop both eat into the same limited voltage budget the far fixture was already working with.
Step 4: Check for Multi-Tap Transformer Settings
Many transformers built for outdoor lighting include several output taps, labeled in small voltage increments, so an installer can select a slightly higher tap for a run with more voltage drop and a lower tap for a shorter run closer to the transformer. A system in which every zone was wired to the same tap, regardless of run length, shows the exact symptom described above: fixtures far from the transformer run dim, while fixtures close to it look fine, even with perfectly healthy wiring throughout. Re-tapping the transformer for a specific zone, rather than replacing the cable or fixtures, sometimes resolves a dimming complaint that appears to be a wiring fault but actually traces back to how the system was set up in the first place. It's a five-minute adjustment at the transformer once the mismatch is identified, compared with tracing and re-splicing an entire buried run, assuming the cable itself is at fault.
Step 5: Confirm GFCI Protection Isn't the Trigger
The outdoor receptacle that an outdoor lighting transformer plugs into must carry ground-fault protection, and moisture getting into a fixture socket or a nicked cable can trip that GFCI, cutting power to the whole transformer and every fixture on it. A tripped GFCI at the source outlet looks identical to a failed transformer from the yard, so it's worth checking the actual outlet before assuming the transformer itself has failed.
Step 6: Rule Out the Fixture's Driver
Fixtures built around integrated LEDs use a small driver circuit to regulate power to the diode, housed inside a sealed section of the fixture body. That driver, not the LED chip itself, is usually the part that fails first, generally due to heat buildup or moisture working past an aging gasket at the fixture's seams. This is a meaningful difference from older incandescent yard-light bulbs, which simply burned out individually and got swapped like any household bulb; a failed LED driver means the whole fixture head typically needs replacing, not just a bulb.
Step 7: Check the Timer or Photocell Settings
Mechanical photocells that sense daylight to switch fixtures on at dusk can degrade over years of outdoor exposure, sometimes sticking in the "off" position or triggering inconsistently. Digital timers can lose their programmed schedule after a power interruption, and a lighting system that "used to work fine" but now runs at odd hours, or not at all, is worth checking against its timer settings before assuming a wiring fault.
Step 8: Weigh In Weather, but Don't Blame It
Heavy rain and sustained heat both accelerate the same failure points rather than creating new ones. Prolonged heat speeds up the breakdown of gasket material at fixture seams and can shorten a driver's working life, while heavy or repeated rain pushes more moisture into any connection that wasn't fully sealed to begin with. Neither condition is the reason a system fails on its own; both simply accelerate an already marginal connection or gasket toward failure faster than mild weather would. A system built with sealed connectors and healthy gaskets holds up across both, which is why chasing connection quality matters more than chasing the forecast. Framing repeat failures as a weather problem also tends to delay the actual fix, since the same connection or gasket issue simply resurfaces again the next time conditions turn extreme, whichever direction that happens to be.
Frequently Asked Questions
Because voltage drop accumulates along the length of the cable run, that fixture is already receiving the least voltage under normal conditions, so it's the first to show dimming and the first to fail outright once corrosion or a marginal connection adds even more resistance to the circuit. Cable gauge plays into this too: a run wired with a lighter-gauge cable loses more voltage per foot than the same run in a heavier-gauge cable, so an undersized cable can produce the same far-fixture dimming pattern over a much shorter distance than expected.
Adding fixtures increases the total load on that run, which increases voltage drop for every fixture already on it and can push the transformer past its rated wattage, causing its internal breaker to trip or shorten its working life. Fixture count alone can be misleading, though: LED fixtures typically draw a fraction of the wattage older halogen outdoor fixtures used, so a system swapped over to LED years ago may still have real capacity on the transformer's rating even with several more fixtures added than the original design called for.
Not necessarily a dedicated breaker of their own, but the exterior receptacle the transformer plugs into needs GFCI protection, and it should have a weatherproof, in-use-rated cover so it stays protected from moisture while something is plugged in.
Usually either a short somewhere in the low-voltage wiring, often from a cable nicked by a shovel, trimmer, or edger, or the total wattage of connected fixtures exceeding what that transformer tap is rated to supply. A short shows up immediately after whatever damaged the cable happens, while an overloaded tap tends to trip only under certain conditions, such as when every fixture on that zone is on at once during peak evening hours.
Yes. Older incandescent yard-light bulbs failed individually and were replaced like any household bulb; integrated LED fixtures typically fail at the internal driver or at a gasket seam that lets in moisture, which usually means replacing the fixture head rather than swapping a bulb. Some fixture lines sell replacement drivers separately from the housing, which is worth checking before assuming the entire fixture body needs to go.
No. Splices should sit inside a sealed, gel-filled connector or a small splice box, not simply twisted together and buried loose, since soil moisture and freeze-thaw movement will work into any unsealed gap over time and corrode the connection from the inside.
Outdoor lighting rarely fails for one reason twice in a row, which is exactly why working the transformer, the connections, and the run's voltage drop in order tends to find the actual cause faster than replacing fixtures one at a time and hoping.
Schedule an outdoor lighting diagnosis — trace the failure back to the transformer, the connections, or the run itself. RSB Electrical Inc. serves Mesa and the Phoenix Valley. ROC 167102. Call (480) 485-4284.
